Reference: 1. Wong, D. S., & Li, J. H. (2000). The omohyoid sling syndrome. American journal of otolaryngology, 21(5), 318-322. 2. Lee, A. D., Yu, A., Young, S. B., Battaglia, P. J., & Ho, C. J. (2015). Omohyoid muscle syndrome in a mixed martial arts athlete: a case report. Sports health, 7(5), 458-462.
3. Kim, L., Kwon, H., & Pyun, S. B. (2009). Pseudodysphagia due to omohyoid muscle syndrome. Dysphagia, 24(3), 357-361.
是六組針對核心, 腿部力量, 平衡與敏捷的訓練
每一組動作又分成三個難度
The second part of FIFA 11+ consists of 6 exercises including core, strength, balance, and agility.
Each exercise has three difficulty level.
我們先介紹前三組動作與困難度的變化
Let's go through the first three movements and their progression.
第一個動作 棒式 Movement 7 Bench
初級
利用前臂與雙腳將自己支撐起來
將肩胛往脊椎收, 腹部與臀部出力
讓身體維持一直線
執行三組, 每組20-30秒
Beginner - The Bench Static
Suppor with forearm and feet.
Pull scapula toward the spine and engage core and gluteus.
Keep trunk straight.
3 sets, 20-30 secs
中級與高級
起始動作與初級相同
中級的動作需要單腳抬起於空中維持兩秒, 雙腳交替
執行三組, 每組40-60秒
高級的動作則須將腳抬離地面10-15公分, 維持20-30秒
執行雙側各三組
Intermediate - Alternate and Advanced - Lift and Hold
The same starting position as the beginner.
Intermediate ask you to raise the leg and hold for 2 sec, then alternating.
3 sets, 40-60 secs
Advanced ask you to raise the leg at least 10-15 cm above ground, and hold 20-30 secs
3 sets on each side
這是一個標準的核心訓練方式
中級與高級動作加入動態下肢動作更能刺激核心的誘發
This is a typical core strengthening.
The intermediate and advanced add lower extremity movement to activate core more.
第二個動作 側棒式 Movement 8 Sideway Bench
初級
側躺, 用上肢與下方的腿支撐
下面的膝蓋彎曲90度
將骨盆與抬起直到身體與膝蓋呈一直線
兩側各執行三組, 每組20-30秒
Beginner - Static
Sidelying, supporting with the forearm and bottom leg
Bending bottom knee to 90 degrees
Raise the pelvis until form a straight line
3 sets on each side, 20-30 secs for each set
中級
與初級相似但下面的腳需伸直
抬高骨盆直到頭到腳成一直線
然後再緩緩放下
兩側各執行三組, 每組20-30秒
Intermediate - Raise and Lower Hip
Similar to the beginner but straight the bottom leg.
Raise pelvis till form a straight line,
and slowly put it down.
3 sets on each side, 20-30 secs for each set
高級
與中級動作相通
再額外加上將上面的腳緩緩抬高放下
兩側各執行三組, 每組20-30秒
Advanced - Leg Lift
Similar to the intermediate.
But lift the top leg up and down slowly while holding the straight line position
3 sets on each side, 20-30 secs for each set
示範影片如下
Below is the video demonstrating movement 7 and 8
第三個動作 腿後肌訓練
膝蓋與髖同寬, 雙手抱胸
緩緩向前傾
過程需保持身體到膝蓋一直線
無法維持姿勢時
向前承重在手掌上, 呈現伏地挺身姿勢
初級執行一組, 3-5次
中級執行一組, 7-10次
高級執行一組, 最少12-15次 Movement 7 Hamstring
Kneeling with knees hip-width apart and crossing arms
Slowly lean forward, keep straight from knee to head.
Put the weight over hand in push-up position while you can't hold the lean forward position.
Beginner, 1 set, 3-5 reps
Intermediate, 1 set, 7-10 reps
Advanced, 1 set, at least 12-15 reps
這個動作又稱作北歐式腿後肌運動
是腿後肌離心收縮訓練的經典代表 研究指出對於腿後肌受傷預防以及傷後復健都有很好的成效
This is also known as Nordic Hamstring Exercise.
It's a classic eccentric training of hamstring. Researches showed this exercise is effective for hamstring injury prevention and rehab.
示範影片如下
Below is the video demonstrating movement 9
包含的低速的跑步與主動伸展總共六個動作
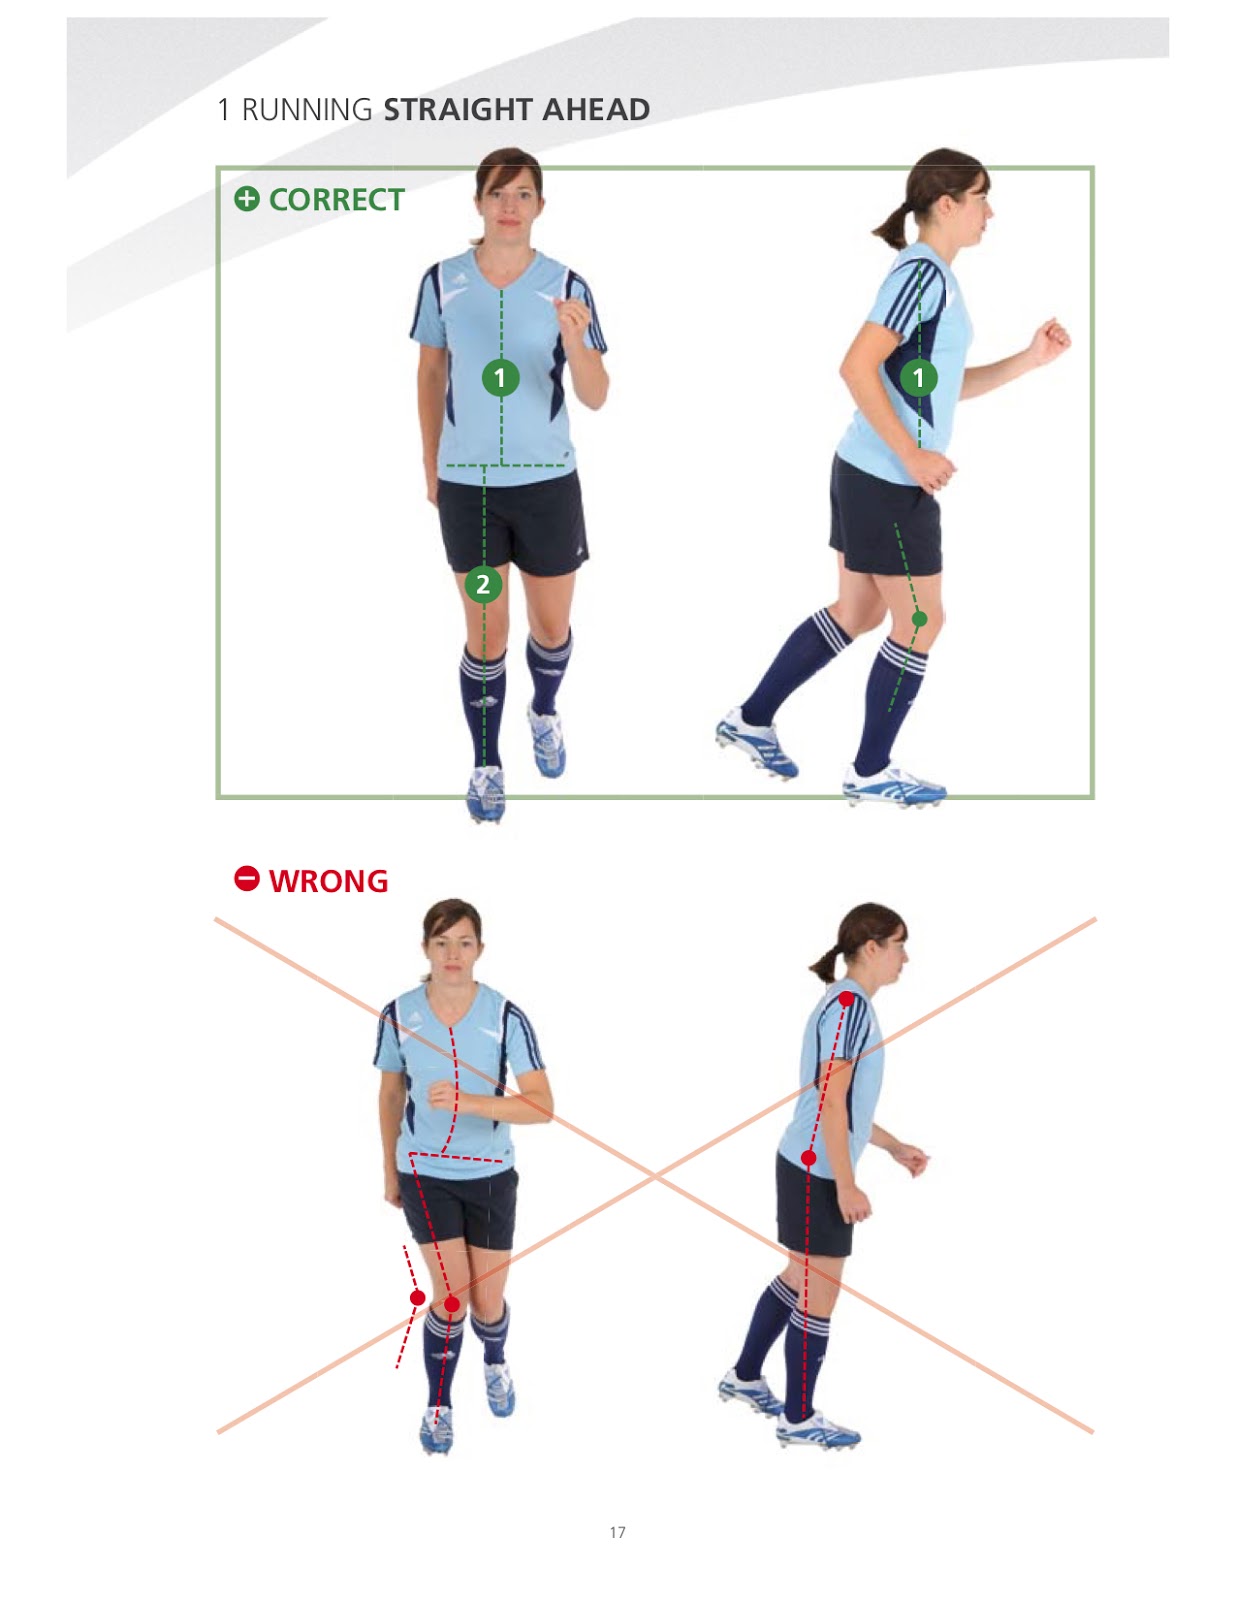
The first part of FIFA 11+ is running exercise.
6 exercises include running at low speed with active stretch.
首先我們要先了解場地的設定 如下圖所示 利用半個足球場進行第一部分的訓練 每個角錐的間距為六公尺 總計六個角錐 First, we need to know how to set the field. As the picture shown below: Using half of the football field for part 1 and 3 Each course has six pairs of cones, around 5-6m apart
第一個動作 直線跑 向前跑到最後一個三角錐然後繞回 回程的時候要比去程略快 總共做兩次 Movement 1, STRAIGHT AHEAD Jog straight to the last cone, slightly more quickly on the way back Two sets
這是基本暖身動作 注意的要點是維持上半身的穩定 與維持骨盆下肢良好的排列
This is the basic exercise for all exercises.
The point is to maintain trunk stability and good lower extremities alignment 第二個動作 開髖 向前跑到第一個三角錐的時候停下 執行一個右髖關節的向外開的旋轉 跑到下一個三角錐時換邊開髖 總共做兩次 Movement 2, HIP OUT Jog to the first cone. stop and lift your knee forwards. Rotate your knee to the side and put your foot down. Jog to the cone and do the exercise on the other leg. Two Sets
第三個動作 收髖 向前跑到第一個三角錐的時候停下 執行一個右髖關節的向內收的旋轉 跑到下一個三角錐時換邊收髖 總共做兩次 Movement 2, HIP IN Jog to the first cone. stop and lift your knee to the side. Rotate your knee forward and put your foot down. Jog to the cone and do the exercise on the other leg. Two Sets
第二與第三個動作強調髖關節的主動伸展動作 同時也需要單腳站立平衡與上半身穩定的能力 下面是示範影片連結 The second and third movement focus on the active stretch of the hip joint. Also, it challenges the trunk stability and the balance in single leg stance. Below is the video demonstrating movement 1-3.
第四個動作 繞同伴 向前跑到第一個三角錐 成90度角向同伴水平移動 兩人互繞一個圈後水平移動回角錐處 然後往下一個角錐前進 重複動作 總共執行兩次 Movement 4, CIRCLING PARTNER Jog forwards to the first cone. Shuffle sideways at a 90-degree angle towards your partner Shuffle an entire circle around one other and back to the first cone. Jog to the next cone and repeat the exercise. 2 Sets
第五個動作 跳躍肩撞 向前跑到第一個三角錐 成90度角向同伴水平移動 兩人靠近後做水平跳躍讓肩膀互相接觸後平移回角錐處 然後往下一個角錐前進 重複動作 總共執行兩次 Movement 4, JUMPING with SHOULDER CONTACT Jog forwards to the first cone. Shuffle sideways at a 90-degree angle towards your partner Side jump toward each other to make shoulder contact and back to the first cone. Jog to the next cone and repeat the exercise. 2 Sets
這兩個動作都加入了冠狀面的移動模式 也是在大多數運動裡面最容易受傷的時候 模擬球場上的移動與對抗 是很有意思的暖身動作 下面是第四與第五個動作的示範連結 Those two movements involve the movement on the frontal plane. It's also the most vulnerable plane of movement for most exercises. By simulating the movement and competition on the field, make it a fun and efficiency as a warm-up exercise. Below is the video demonstrating movement 4 and 5
第六個動作 前後衝刺 向前跑到第二個三角錐 然後背向衝刺回到第一個三角錐 重複向前兩個角錐, 向後一個角錐 直到最後一個角錐為止 總共執行兩次 Movement 6 QUICK FORWARD and BACKWARD SPRINT Run quickly to the second cone then run backward quickly to the first cone, keeping your hips and knees slightly bent. Repeat, running two cones forwards and one cone backward.
這個動作的注意重點與第一個相同 同樣要維持穩定與排列 但多增加了前後移動的轉換能力 下面是示範影片 The principle is the same as the first movement, keep trunk stable and good lower extremities alignment. But adding the transition between forward and backward movement. Below is the video demonstrating movement 6
第一個階段
強調的重點在於 不同移動情況下維持軀幹穩定與理想下肢排列 這也是避免運動中受傷的基礎之一
In FIFA 11+ Part 1, Trunk stability and ideal lower limb alignment under different movement situation are emphasized It is also the basic strategy to prevent sports injury.
多裂肌是人體背側重要的核心肌群 由薦骨開始一路向上到頸椎 每一個單位向上2-4節脊椎連結到棘突上 是重要的脊椎穩定肌群 Multifidus is the important core muscle on the back From sacrum all the way up to neck Every unit goes 2-4 segment above toward the spinous process.
Play an important role as a lumbar stablizer
由於多裂肌本身的組織排列
在身體向前彎曲時多裂肌可以產生最大的肌力
這也間接證實了多裂肌在矢狀面上身為穩定肌群的能力
Due the the sacromere length change,
Multifidus generates max strength output during trunk flexion.
That somehow implies the ability as a trunk stabilizer on saggital plane.
許多的研究顯示在慢性下背痛的患者身上
會發現多裂肌失能的狀況
也會在影像學上觀察到
明顯腰部多裂肌受到脂肪組織取代萎縮的現象
Many researches showed that multifidus dysfunction occur among chronic low back pain population.
Also form image studies,
the fat will infiltrate multifidus tissue, A.K.A multifidus atrophy.
因此如何正確的評估與誘發多裂肌的活動
對於下背痛的患者來說非常重要
Thus, its important to assess and activate multifidus for low back pain population.
臨床上有兩個適合評估多裂肌的動作
多裂肌抬高測試(MLT)以及後彎測試
There are two excellent movements can be used to assess multifidus.
Multifidus Lifting Test (MLT) and multi-segmental extension test
多裂肌抬高測試是在四足跪姿下進行
受試者需先維持脊椎中立
然後將腳或手抬起
如果腰椎無法維持姿勢就是陽性
MLT is performed under quadruped position
The subject need to get the neutral spine first,
then raising arm or leg or both.
Belly dropping or can not maintain neutral spine are consider positive
後彎動作是另一個非常簡單可以快速執行的理學測試
主要評估要點有兩個
1. 腰椎是否過度前凸
2. 脊椎是否有折點出現
這兩個現象都表示多裂肌的失能導致無法有效的分散後彎壓力
Multi-segmental extension is another easy PE.
There are two signs we need to watch out
1. Hyperlordorsis of the lumbar
2. Any hinge point on the spine
Both signs tell you that multifidus is dysfuntion that cannot distribute the pressure properly.
當我們處理完結構上或肌肉控制的問題之後
我們必須要指導個案如何正確使用多裂肌
下面介紹兩個我常用的多裂肌啟動與訓練的方式
After dealing with the structural issue and motor control issue,
we need to teach them how to use their multifidus.
Below are two exercises I use a lot to activate multifidus.
改良多裂肌超人式
傳統超人式在執行上容易過度使用脖子與豎脊肌群
反而可能造成更多的症狀產生
而在將手腳抬起前
先讓上肢往身體收進來
可以徵召核心穩定肋骨
Mofified Superman by Dr. Kathy Dooley
Original superman may over recruit neck and erector spinae during practice,
which might make the symptom worse.
Instead, you can add a pulling movement of the arms before raising limbs.
That can help you recruit core muscles to stabilize ribs during movement.
側躺多裂肌啟動
想像你的胯下與背後有一條線連接在一起
將這條線縮短並把腰椎向上略為抬高
從屁股的位置給予一個輕輕向前推的力量
另一隻手可以去感受多裂肌是否收縮或式產生過度豎脊肌活化
Sidelying Mf activation
Think about there's a ling connecting your groin and lumbar spine
Contracting this line gently and lifting lumbar vertebra up slightly
Then you can give light resistance to push pelvis forward
Another hand can touch their back to feel if the Mf is contracting or erector is over activating.
多裂肌是背後的核心
協助我們抵抗重力與旋轉
下背的穩定除了腹肌核心以外
多裂肌的訓練是一個不可忽略的重要因素
Multifidus is core of the back.
It assists us against gravity and rotation.
In order to stabilize low back spine,
multifidus is one muscle you can not neglect.
參考文獻
1. Freeman, M. D., Woodham, M. A., & Woodham, A. W. (2010). The role of the lumbar multifidus in chronic low back pain: a review. PM&R, 2(2), 142-146.
2.Ward, S. R., Kim, C. W., Eng, C. M., Gottschalk IV, L. J., Tomiya, A., Garfin, S. R., & Lieber, R. L. (2009). Architectural analysis and intraoperative measurements demonstrate the unique design of the multifidus muscle for lumbar spine stability. The Journal of Bone and Joint Surgery. American volume., 91(1), 176.
3. Fortin, M., & Macedo, L. G. (2013). Multifidus and paraspinal muscle group cross-sectional areas of patients with low back pain and control patients: a systematic review with a focus on blinding. Physical therapy, 93(7), 873-888.
4. Kjaer, P., Bendix, T., Sorensen, J. S., Korsholm, L., & Leboeuf-Yde, C. (2007). Are MRI-defined fat infiltrations in the multifidus muscles associated with low back pain?. BMC medicine, 5(1), 2.
By Mikael Häggström.When using this image in external works, it may be cited as:Häggström, Mikael (2014). "Medical gallery of Mikael Häggström 2014". WikiJournal of Medicine 1 (2). DOI:10.15347/wjm/2014.008. ISSN 2002-4436. Public Domain.orBy Mikael Häggström, used with permission. (Image:Gray409.png) [Public domain or Public domain], via Wikimedia Commons
上斜方肌是另一條肩頸相關的重要肌肉
與提肩胛肌關係密切
負責的動作有頸椎後仰, 同側側彎, 對側旋轉
而在肩膀的位置則負責肩胛骨的上提與上轉
Upper trapezius is another important muscle of neck-shoulder area
It has the close relationship with levator scapulae
The movement at the cervical are extension, same side side-bending, opposite side rotation
And the movement at the shoulder are elevation and upward rotation
上斜方肌過度緊繃的時候
常見的情況有 1. 頭部旋轉, 側彎活動受限 2. 肩關節活動障礙 3. 在枕骨下外側, 頸肩連線中點 或後3/1鎖骨處產生酸痛點
Some common conditions while upper trapezius is tight: 1. Neck side-bending and rotation limitation 2. Shoulder dysfunction
3. Tender points over the lateral suboccipital area, mid-point of the shoulder, or 1/3 of the clavicle
靜態伸展上斜方肌的動作是 1. 頭部向對側側彎加上同側旋轉 2. 對側手拉住頭部 3. 同側手向下固定
The static stretch includes the following movement: 1. Neck side bends to opposite side and turns to the same side. 2. Opposite hand holds the neck 3. Same side arm anchor at the bottom
Below is the standard static stretch of upper trapezius.
一樣由我示範如何執行動態伸展
頭部的姿勢維持不變
讓同一側的肩胛上抬, 再下壓 利用肩胛骨上下的動作進行上斜方肌的伸展
Let me show you how to perform dynamic stretch to this muscle
The head and opposite hand position remain.
The same side shoulder elevates up and down, using scapula elevation/depression to stretch this muscle.
斜方肌也是辦公室一族非常容易不舒服的位置
藉由簡單的左右旋轉就可以分辨到底是斜方肌還是提肩胛肌的緊繃
Upper trapezius is also the common tight muscle among office population
By simply rotating your head to both sides, you can differentiate which muscle is truly tight.


